IP Server 192.168.11.11
Example name server ns.irdhy.com
Langsung aja boss
1.Install Bind9 dan dnsutils
- apt-get install bind9
- apt-get install dnsutils
- /etc/init.d/bind9 restart
2.Masuk ke direktori named.conf.local karena konfigurasi akan tersimpan disini
- nano /etc/bind/named.conf.local
3.Tambahkan zone untuk ns.irdhy.com sbb :
zone "irdhy.com" {
type master;
file "/etc/bind/db.irdhy.com";
};
4.Copy file db.local ke db.irdhy.com agar mudah dikonfigurasi
- cp /etc/bind/db.local /etc/bind/db.irdhy.com
5.Config file db.irdhy.com sbb :
; BIND data file for local loopback interface
;
$TTL 604800
@ IN SOA ns.irdhy.com. root.irdhy.com. (
2 ; Serial
604800 ; Refresh
86400 ; Retry
2419200 ; Expire
604800 ) ; Negative Cache TTL
;
@ IN NS ns.irdhy.com.
@ IN A 127.0.0.1
@ IN AAAA ::1
ns IN A 192.168.11.11
6.Masuk kembali ke direktori named.conf.local
- nano /etc/bind/named.conf.local
7.Tambahkan zone untuk ip address sbb :
zone "11.168.192.in-addr.arpa" {
type master;
notify no;
file "/etc/bind/db.ipaddress";
};
8.Copy file db.127 ke db.ipaddress agar mudah dikonfigurasi
- cp /etc/bind/db.127 /etc/bind/db.ipaddress
9.Config File db.ipaddress sbb :
; BIND reverse data file for local loopback interface
;
$TTL 604800
@ IN SOA ns.irdhy.com. root.irdhy.com. (
1 ; Serial
604800 ; Refresh
86400 ; Retry
2419200 ; Expire
604800 ) ; Negative Cache TTL
;
@ IN NS ns.
11 IN PTR ns.irdhy.com.
10. Restart Bind9
- /etc/init.d/bind9 restart
Selesai
Ini Hasil nya boss...
Di Linux Ubuntu 10.10
root@irdhy:/home/irdhy# /etc/init.d/bind9 restart
* Stopping domain name service... bind9 [ OK ]
* Starting domain name service... bind9 [ OK ]
root@irdhy:/home/irdhy# nslookup www.yahoo.com
Server: 192.168.11.11
Address: 192.168.11.11#53
Non-authoritative answer:
www.yahoo.com canonical name = fp.wg1.b.yahoo.com.
fp.wg1.b.yahoo.com canonical name = any-fp.wa1.b.yahoo.com.
Name: any-fp.wa1.b.yahoo.com
Address: 72.30.2.43
Name: any-fp.wa1.b.yahoo.com
Address: 98.137.149.56
root@irdhy:/home/irdhy# dig -x 127.0.0.1
;; Query time: 0 msec
;; SERVER: 192.168.11.11#53(192.168.11.11)
;; WHEN: Sun Apr 24 04:19:02 2011
;; MSG SIZE rcvd: 121
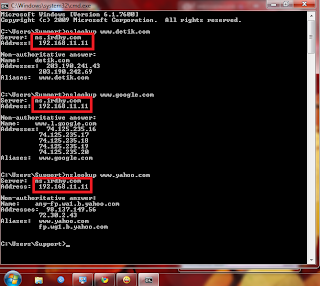
Di Windows 7 Ultimate
Selamat mencoba
Note :
- IP Address untuk DNS Server harus menggunakan IP Statik
- Ganti 11.168.192 tiga oktet pertama jaringan yang anda gunakan
- Juga file zona /etc/bind/db.ipaddress harus tepat. Hal ini juga harus disesuaikan dengan oktet pertama jaringan anda.
- Saya membuat hanya 1 Dns saja ( Primary Master ) untuk slave ( Secondary Master ) nya bisa lihat di Ubuntu Server Guide
Terima kasih.
Referensi