
Langsunga Aja bos..
GPL Login Root
1. Download Zimbra for Centos
- wget http://files2.zimbra.com/downloads/7.1.1_GA/zcs-7.1.1_GA_3196.RHEL5.20110527011124.tgz
2. Install sysstat
- yum -y install sysstat gmp libidn libstdc++ sqlite bind bind-chroot
( Kayaknya yg belum ada cuma sysstat di Centos 5.6 Hehehe.. Buat Jaga2 Aja )
3. Matikan Firewall, sendmail dan Selinux
- service iptables stop
- service ip6tables stop
- service sendmail stop
- chkconfig iptables off
- chkconfig ip6tables off
- chkconfig sendmail off
4. Rubah Hosts
- vi /etc/hosts
127.0.0.1 localhost
192.168.11.11 mail.irdhy.com
5. Rubah hostname di network
- vi /etc/sysconfig/network
HOSTNAME= mail
6. Edit Bind ( Untuk DNS Name Server ) buat file named.conf
- vi /var/named/chroot/etc/named.conf
options {
allow-query { 192.168.11.0/24; };
listen-on port 53 { 192.168.11.11; };
directory "/var/named";
statistics-file "/var/named/data/named_stats.txt";
# FORWARD ZONE ( HOSTNAME TO IP ADDRESS )
zone "irdhy.com" IN {
type master;
file "forward.zone";
allow-update { none; };
};
# REVERSE ZONE ( IP ADDRESS TO HOSTNAME )
zone "11.168.192.in-addr.arpa" IN {
type master;
file "reverse.zone";
allow-update { none; };
};
7.Buat File Forward Zone ( Untuk Hostname )
- vi /var/named/chroot/var/named/forward.zone
Config file Forward Zone sbb :
$ORIGIN irdhy.com.
$TTL 86400
@ IN SOA ns1.irdhy.com. hostmaster.irdhy.com. (
2001062501 ; serial
21600 ; refresh after 6 hours
3600 ; retry after 1 hour
604800 ; expire after 1 week
86400 ) ; minimum TTL of 1 day
;
;
IN NS ns1.irdhy.com.
ns1 IN A 192.168.11.11
;
;
@ IN MX 10 mail.irdhy.com.
mail IN A 192.168.11.11
;
;
; This sample zone file illustrates sharing the same IP addresses
; for multiple services:
;
services IN A 192.168.11.11
ftp IN CNAME services.irdhy.com.
www IN CNAME services.irdhy.com.
8. Buat File Reverse Zone ( Untuk IP Address )
- vi /var/named/chroot/var/named/reverse.zone
Config File Reverse Zone sbb :
$ORIGIN 11.168.192.in-addr.arpa.
$TTL 86400
@ IN SOA ns1.irdhy.com. hostmaster.irdhy.com. (
2001062501 ; serial
21600 ; refresh after 6 hours
3600 ; retry after 1 hour
604800 ; expire after 1 week
86400 ) ; minimum TTL of 1 day
;
@ IN NS ns1.irdhy.com.
11 IN PTR ns1.irdhy.com.
9. Restart Bind
- /etc/init.d/named restart
- service named start
10. Agar Config yg kita buat langsung berjalan ( Autorun )
- chkconfig named on
11. Extrak file zimbra yg tadi di download
- tar zxvf zcs-7.1.1_GA_3196.RHEL5.20110527011124.tgz
12. Masuk direktori zcs-7.1.1_GA_3196.RHEL5.20110527011124.tgz
- cd zcs-7.1.1_GA_3196.RHEL5.20110527011124.tgz
- ./install --platform-override
Operations logged to /tmp/install.log.28057
Checking for existing installation...
zimbra-ldap...NOT FOUND
zimbra-logger...NOT FOUND
zimbra-mta...NOT FOUND
zimbra-snmp...NOT FOUND
zimbra-store...NOT FOUND
zimbra-apache...NOT FOUND
zimbra-spell...NOT FOUND
zimbra-convertd...NOT FOUND
zimbra-memcached...NOT FOUND
zimbra-proxy...NOT FOUND
zimbra-archiving...NOT FOUND
zimbra-cluster...NOT FOUND
zimbra-core...NOT FOUND
PLEASE READ THIS AGREEMENT CAREFULLY BEFORE USING THE SOFTWARE.
ZIMBRA, INC. ("ZIMBRA") WILL ONLY LICENSE THIS SOFTWARE TO YOU IF YOU
FIRST ACCEPT THE TERMS OF THIS AGREEMENT. BY DOWNLOADING OR INSTALLING
THE SOFTWARE, OR USING THE PRODUCT, YOU ARE CONSENTING TO BE BOUND BY
THIS AGREEMENT. IF YOU DO NOT AGREE TO ALL OF THE TERMS OF THIS
AGREEMENT, THEN DO NOT DOWNLOAD, INSTALL OR USE THE PRODUCT.
License Terms for the Zimbra Collaboration Suite:
http://www.zimbra.com/license/zimbra_public_eula_2.1.html
Do you agree with the terms of the software license agreement? [N] y
Checking for prerequisites...
FOUND: NPTL
FOUND: sudo-1.7.2p1-9
FOUND: libidn-0.6.5-1.1
FOUND: gmp-4.1.4-10
FOUND: /usr/lib/libstdc++.so.6
Checking for suggested prerequisites...
FOUND: perl-5.8.8
FOUND: sysstat
FOUND: sqlite
Prerequisite check complete.
Checking for installable packages
Found zimbra-core
Found zimbra-ldap
Found zimbra-logger
Found zimbra-mta
Found zimbra-snmp
Found zimbra-store
Found zimbra-apache
Found zimbra-spell
Found zimbra-memcached
Found zimbra-proxy
Select the packages to install
Install zimbra-ldap [Y]
Install zimbra-logger [Y]
Install zimbra-mta [Y]
Install zimbra-snmp [Y]
Install zimbra-store [Y]
Install zimbra-apache [Y]
Install zimbra-spell [Y]
Install zimbra-memcached [N]
Install zimbra-proxy [N]
Checking required space for zimbra-core
checking space for zimbra-store
Installing:
zimbra-core
zimbra-ldap
zimbra-logger
zimbra-mta
zimbra-snmp
zimbra-store
zimbra-apache
zimbra-spell
You appear to be installing packages on a platform different
than the platform for which they were built.
This platform is CentOS5
Packages found: RHEL5
This may or may not work.
Using packages for a platform in which they were not designed for
may result in an installation that is NOT usable. Your support
options may be limited if you choose to continue.
Install anyway? [N] y
The system will be modified. Continue? [N] y
Removing /opt/zimbra
Removing zimbra crontab entry...done.
done.
Cleaning up zimbra init scripts...done.
Cleaning up /etc/ld.so.conf...done.
Cleaning up /etc/prelink.conf...done.
Cleaning up /etc/security/limits.conf...done.
Finished removing Zimbra Collaboration Suite.
Installing packages
zimbra-core......zimbra-core-7.0.0_GA_3077.RHEL5-20110127201734.i386.rpm...done
zimbra-ldap......zimbra-ldap-7.0.0_GA_3077.RHEL5-20110127201734.i386.rpm...done
zimbra-logger......zimbra-logger-7.0.0_GA_3077.RHEL5-20110127201734.i386.rpm...done
zimbra-mta......zimbra-mta-7.0.0_GA_3077.RHEL5-20110127201734.i386.rpm...done
zimbra-snmp......zimbra-snmp-7.0.0_GA_3077.RHEL5-20110127201734.i386.rpm...done
zimbra-store......zimbra-store-7.0.0_GA_3077.RHEL5-20110127201734.i386.rpm...done
zimbra-apache......zimbra-apache-7.0.0_GA_3077.RHEL5-20110127201734.i386.rpm...done
zimbra-spell......zimbra-spell-7.0.0_GA_3077.RHEL5-20110127201734.i386.rpm...done
Operations logged to /tmp/zmsetup.03082011-121509.log
Installing LDAP configuration database...done.
Setting defaults...
DNS ERROR resolving MX for mail.irdhy.com
It is suggested that the domain name have an MX record configured in DNS
Change domain name? [Yes]
Create domain: [mail.irdhy.com] irdhy.com
MX: mail.mydomain.com (192.168.11.11)
Interface: 192.168.11.11
Interface: 127.0.0.1
done.
Checking for port conflicts
Main menu
1) Common Configuration:
2) zimbra-ldap: Enabled
3) zimbra-store: Enabled
+Create Admin User: yes
+Admin user to create: admin@mydomain.com
******* +Admin Password UNSET
+Anti-virus quarantine user: virus-quarantine.knuolbvduy@mydomain.com
+Enable automated spam training: yes
+Spam training user: spam.rwbsv81z8o@mydomain.com
+Non-spam(Ham) training user: ham.tnyvjvcvlt@mydomain.com
+SMTP host: mail.mydomain.com
+Web server HTTP port: 80
+Web server HTTPS port: 443
+Web server mode: http
+IMAP server port: 143
+IMAP server SSL port: 993
+POP server port: 110
+POP server SSL port: 995
+Use spell check server: yes
+Spell server URL: http://mail.mydomain.com:7780/aspell.php
+Configure for use with mail proxy: FALSE
+Configure for use with web proxy: FALSE
+Enable version update checks: TRUE
+Enable version update notifications: TRUE
+Version update notification email: admin@mydomain.com
+Version update source email: admin@mydomain.com
4) zimbra-mta: Enabled
5) zimbra-snmp: Enabled
6) zimbra-logger: Enabled
7) zimbra-spell: Enabled
8) Default Class of Service Configuration:
r) Start servers after configuration yes
s) Save config to file
x) Expand menu
q) Quit
Address unconfigured (**) items (? - help) 3
Store configuration
1) Status: Enabled
2) Create Admin User: yes
3) Admin user to create: admin@mydomain.com
** 4) Admin Password UNSET
5) Anti-virus quarantine user: virus-quarantine.knuolbvduy@mydomain.com
6) Enable automated spam training: yes
7) Spam training user: spam.rwbsv81z8o@mydomain.com
8) Non-spam(Ham) training user: ham.tnyvjvcvlt@mydomain.com
9) SMTP host: mail.mydomain.com
10) Web server HTTP port: 80
11) Web server HTTPS port: 443
12) Web server mode: http
13) IMAP server port: 143
14) IMAP server SSL port: 993
15) POP server port: 110
16) POP server SSL port: 995
17) Use spell check server: yes
18) Spell server URL: http://mail.mydomain.com:7780/aspell.php
19) Configure for use with mail proxy: FALSE
20) Configure for use with web proxy: FALSE
21) Enable version update checks: TRUE
22) Enable version update notifications: TRUE
23) Version update notification email: admin@mydomain.com
24) Version update source email: admin@mydomain.com
Select, or 'r' for previous menu [r] 4
Password for admin@mydomain.com (min 6 characters): [d2_mRsiclJ] Test
Store configuration
1) Status: Enabled
2) Create Admin User: yes
3) Admin user to create: admin@mydomain.com
4) Admin Password set
5) Anti-virus quarantine user: virus-quarantine.knuolbvduy@mydomain.com
6) Enable automated spam training: yes
7) Spam training user: spam.rwbsv81z8o@mydomain.com
8) Non-spam(Ham) training user: ham.tnyvjvcvlt@mydomain.com
9) SMTP host: mail.mydomain.com
10) Web server HTTP port: 80
11) Web server HTTPS port: 443
12) Web server mode: http
13) IMAP server port: 143
14) IMAP server SSL port: 993
15) POP server port: 110
16) POP server SSL port: 995
17) Use spell check server: yes
18) Spell server URL: http://mail.mydomain.com:7780/aspell.php
19) Configure for use with mail proxy: FALSE
20) Configure for use with web proxy: FALSE
21) Enable version update checks: TRUE
22) Enable version update notifications: TRUE
23) Version update notification email: admin@mydomain.com
24) Version update source email: admin@mydomain.com
Select, or 'r' for previous menu [r]
Main menu
1) Common Configuration:
2) zimbra-ldap: Enabled
3) zimbra-store: Enabled
4) zimbra-mta: Enabled
5) zimbra-snmp: Enabled
6) zimbra-logger: Enabled
7) zimbra-spell: Enabled
8) Default Class of Service Configuration:
r) Start servers after configuration yes
s) Save config to file
x) Expand menu
q) Quit
*** CONFIGURATION COMPLETE - press 'a' to apply
Select from menu, or press 'a' to apply config (? - help) a
Save configuration data to a file? [Yes
Save config in file: [/opt/zimbra/config.2450]
Saving config in /opt/zimbra/config.2450...done.
The system will be modified - continue? [No] y
Operations logged to /tmp/zmsetup.03082011-121509.log
Setting local config values...done.
Setting up CA...done.
Deploying CA to /opt/zimbra/conf/ca ...done.
Creating SSL certificate...done.
Installing mailboxd SSL certificates...done.
Initializing ldap...done.
Setting replication password...done.
Setting Postfix password...done.
Setting amavis password...done.
Setting nginx password...done.
Creating server entry for mail.mydomain.com...done.
Saving CA in ldap ...done.
Saving SSL Certificate in ldap ...done.
Setting spell check URL...done.
Setting service ports on mail.mydomain.com...done.
Adding mail.mydomain.com to zimbraMailHostPool in default COS...done.
Installing webclient skins...
lavender...done.
waves...done.
bones...done.
sky...done.
steel...done.
beach...done.
bare...done.
smoke...done.
pebble...done.
carbon...done.
oasis...done.
tree...done.
lake...done.
twilight...done.
hotrod...done.
sand...done.
lemongrass...done.
Finished installing webclient skins.
Setting zimbraFeatureTasksEnabled=TRUE...done.
Setting zimbraFeatureBriefcasesEnabled=TRUE...done.
Setting MTA auth host...done.
Setting TimeZone Preference...done.
Initializing mta config...done.
Setting services on mail.mydomain.com...done.
Creating domain mydomain.com...done.
Setting default domain name...done.
Creating domain mydomain.com...already exists.
Creating admin account admin@mydomain.com...done.
Creating root alias...done.
Creating postmaster alias...done.
Creating user spam.rwbsv81z8o@mydomain.com...done.
Creating user ham.tnyvjvcvlt@mydomain.com...done.
Creating user virus-quarantine.knuolbvduy@mydomain.com...done.
Setting spam training and Anti-virus quarantine accounts...done.
Initializing store sql database...done.
Setting zimbraSmtpHostname for mail.mydomain.com...done.
Configuring SNMP...done.
Checking for default IM conference room...not present.
Initializing default IM conference room...done.
Setting up syslog.conf...done.
You have the option of notifying Zimbra of your installation.
This helps us to track the uptake of the Zimbra Collaboration Suite.
The only information that will be transmitted is:
The VERSION of zcs installed (7.0.0_GA_3077_CentOS5)
The ADMIN EMAIL ADDRESS created (admin@mydomain.com)
Notify Zimbra of your installation? [Yes] No
Notification skipped
Starting servers...done.
Installing common zimlets...
com_zimbra_social...done.
com_zimbra_dnd...done.
com_zimbra_srchhighlighter...done.
com_zimbra_attachcontacts...done.
com_zimbra_adminversioncheck...done.
com_zimbra_date...done.
com_zimbra_email...done.
com_zimbra_attachmail...done.
com_zimbra_phone...done.
com_zimbra_cert_manager...done.
com_zimbra_linkedin...done.
com_zimbra_bulkprovision...done.
com_zimbra_webex...done.
com_zimbra_url...done.
Finished installing common zimlets.
Restarting mailboxd...done.
Setting up zimbra crontab...done.
Moving /tmp/zmsetup.03082011-121509.log to /opt/zimbra/log
Configuration complete - press return to exit
Selesai....
Dan silahkan ketikan mail.irdhy.com login dengan user admin dan password yg tadi dibuat..
dan untuk konfigurasinya klik di admin console
Terima kasih
Selamat mencoba..
Note.. Untuk Contoh instalasi diatas menggunakan zimbra 7.0.0 ( Copas dari )
- http://www.techonia.com/install-zimbra-7-centos-5-part2
- http://www.techonia.com/install-zimbra-7-centos-5-part2
karena langkah2nya sama persis.. mydomain bisa diganti irdhy.com atau domain anda..
Terima kasih..
Membuat Webmail Server ( Using Roundcube ) Fedora 14
Langsung Aja Bos
Note :
Pastikan IMAP / POP Server dan SMTP Server sudah terinstall dan berjalan dengan benar.
1. Install Roundcubemail
- yum install roundcubemail
2. Install Mysql Server
- yum install mysql-server
3. Start dan Cek Konfig Agar Mysql AutoRun
- service mysqld start
- chkconfig mysqld on
4. Buat password pada Mysql Server dan Database Webmail
- mysqladmin -u root password 'P4ssword'
- mysqladmin -u root -pP4ssword create webmail
5. Masuk Direktori Mysql
- mysql -uroot -pP4ssword
Note :
P4ssword adalah Password yg digunakan untuk Mysql
6. Bila sudah masuk direktori mysql ( mysql> )
- GRANT ALL ON webmail.* to 'webmail'@'localhost' IDENTIFIED BY 'webmail';
- FLUSH PRIVILEGES;
7. Keluar dari Mysql
- exit
8. Masuk Direktori SQL
- cd /usr/share/doc/roundcubemail-0.3.1/SQL
- mysql -u webmail -p webmail < mysql.initial.sql
Enter password:webmail
- cd
9. Masuk Direktori Roundcube Php
- vi /etc/roundcubemail/db.inc.php
# line 21: change like follows ( replace your password for 'roundcube' )
$rcmail_config['db_dsnw'] = 'mysql://webmail:webmail@localhost/webmail';
10. Masuk Direktori Rouncube Main.Inc.PHP
- vi /etc/roundcubemail/main.inc.php
# line IMAP auth type. Can be "auth" (CRAM-MD5), "plain" (PLAIN) or "check" to auto detect. Optional, defaults to "check"
$rcmail_config['imap_auth_type'] = 'plain';
# line Default Host Rubah Menjadi :
$rcmail_config['default_host'] = 'irdhy.com';
# line automatically create the above listed default folders on login
$rcmail_config['create_default_folders'] = TRUE;
# line Mail Domain Rubah Menjadi :
$rcmail_config['mail_domain'] = 'irdhy.com';
# line useragent Rubah Menjadi :
$rcmail_config['useragent'] = 'Irdhy Webmail';
# line productname Rubah Menjadi :
$rcmail_config['product_name'] = 'Irdhy Webmail';
# line timezone
$rcmail_config['dst_active'] = (bool)date_default_timezone_set('Asia/Jakarta');
# line Log IMAP conversation to/imap or to syslog
$rcmail_config['imap_debug'] = true;
11. Masuk Direktori Roundcubemail.conf
- vi /etc/httpd/conf.d/roundcubemail.conf
# line 5: change
Alias /webmail /usr/share/roundcubemail
Order Deny,Allow
Deny from all
Allow from 127.0.0.1 10.0.0.0/24# IP address you allow
12. Edit File /etc/httpd/conf/httpd.conf
- vi /etc/httpd/conf/httpd.conf
* Line ServerAdmin root@localhost >> root@localhost ganti dengan Email yg valid
* Line #ServerName www.example.com:80 >> hilangkan tanda # dan ganti dengan domain anda
13. Edit file /etc/php.ini
- vi /etc/php.ini
* Line ; Maximum amount of memory a script may consume (16M)
* Rubah Line memory_limit - 64M
14. Restart httpd dan Cek konfigurasi httpd agar AutoRun
- service httpd start
- /etc/rc.d/init.d/httpd restart
Stopping httpd: [ OK ]
Starting httpd: [ OK ]
- chkconfig httpd on
Selesai.. Harusnya sudah bisa jalan..
Ketikan ipaddress/webmail
Untuk tambahan..
Ini Untuk Tambahan Jika Menggunakan SSL / TLS Encryption Config
- vi /etc/roundcubemail/main.inc.php
# line 66: specify IMAP server (SSL)
$rcmail_config['default_host'] = 'ssl://mail.irdhy.com';
# line 69: specify IMAP port (SSL)
$rcmail_config['default_port'] = 993;
# line 87: specify domain name
$rcmail_config['mail_domain'] = 'irdhy.com';
# line 102: specify SMTP server (SSL)
$rcmail_config['smtp_server'] = 'ssl://mail.irdhy.com';
# line 105: specify SMTP port (SSL)
$rcmail_config['smtp_port'] = 465;
# line 180: change UserAgent
$rcmail_config['useragent'] = 'Irdhy Webmail';
# line 183: change title
$rcmail_config['product_name'] = 'Irdhy Webmail';
Note :
Untuk Edit2 Logo
/usr/share/roundcubemail/skins/default/templates/login.html
Edit Gambar
/usr/share/roundcubemail/skins/default/images/
Note :
Pastikan IMAP / POP Server dan SMTP Server sudah terinstall dan berjalan dengan benar.
1. Install Roundcubemail
- yum install roundcubemail
2. Install Mysql Server
- yum install mysql-server
3. Start dan Cek Konfig Agar Mysql AutoRun
- service mysqld start
- chkconfig mysqld on
4. Buat password pada Mysql Server dan Database Webmail
- mysqladmin -u root password 'P4ssword'
- mysqladmin -u root -pP4ssword create webmail
5. Masuk Direktori Mysql
- mysql -uroot -pP4ssword
Note :
P4ssword adalah Password yg digunakan untuk Mysql
6. Bila sudah masuk direktori mysql ( mysql> )
- GRANT ALL ON webmail.* to 'webmail'@'localhost' IDENTIFIED BY 'webmail';
- FLUSH PRIVILEGES;
7. Keluar dari Mysql
- exit
8. Masuk Direktori SQL
- cd /usr/share/doc/roundcubemail-0.3.1/SQL
- mysql -u webmail -p webmail < mysql.initial.sql
Enter password:webmail
- cd
9. Masuk Direktori Roundcube Php
- vi /etc/roundcubemail/db.inc.php
# line 21: change like follows ( replace your password for 'roundcube' )
$rcmail_config['db_dsnw'] = 'mysql://webmail:webmail@localhost/webmail';
10. Masuk Direktori Rouncube Main.Inc.PHP
- vi /etc/roundcubemail/main.inc.php
# line IMAP auth type. Can be "auth" (CRAM-MD5), "plain" (PLAIN) or "check" to auto detect. Optional, defaults to "check"
$rcmail_config['imap_auth_type'] = 'plain';
# line Default Host Rubah Menjadi :
$rcmail_config['default_host'] = 'irdhy.com';
# line automatically create the above listed default folders on login
$rcmail_config['create_default_folders'] = TRUE;
# line Mail Domain Rubah Menjadi :
$rcmail_config['mail_domain'] = 'irdhy.com';
# line useragent Rubah Menjadi :
$rcmail_config['useragent'] = 'Irdhy Webmail';
# line productname Rubah Menjadi :
$rcmail_config['product_name'] = 'Irdhy Webmail';
# line timezone
$rcmail_config['dst_active'] = (bool)date_default_timezone_set('Asia/Jakarta');
# line Log IMAP conversation to
$rcmail_config['imap_debug'] = true;
11. Masuk Direktori Roundcubemail.conf
- vi /etc/httpd/conf.d/roundcubemail.conf
# line 5: change
Alias /webmail /usr/share/roundcubemail
Order Deny,Allow
Deny from all
Allow from 127.0.0.1 10.0.0.0/24# IP address you allow
12. Edit File /etc/httpd/conf/httpd.conf
- vi /etc/httpd/conf/httpd.conf
* Line ServerAdmin root@localhost >> root@localhost ganti dengan Email yg valid
* Line #ServerName www.example.com:80 >> hilangkan tanda # dan ganti dengan domain anda
13. Edit file /etc/php.ini
- vi /etc/php.ini
* Line ; Maximum amount of memory a script may consume (16M)
* Rubah Line memory_limit - 64M
14. Restart httpd dan Cek konfigurasi httpd agar AutoRun
- service httpd start
- /etc/rc.d/init.d/httpd restart
Stopping httpd: [ OK ]
Starting httpd: [ OK ]
- chkconfig httpd on
Selesai.. Harusnya sudah bisa jalan..
Ketikan ipaddress/webmail
Untuk tambahan..
Ini Untuk Tambahan Jika Menggunakan SSL / TLS Encryption Config
- vi /etc/roundcubemail/main.inc.php
# line 66: specify IMAP server (SSL)
$rcmail_config['default_host'] = 'ssl://mail.irdhy.com';
# line 69: specify IMAP port (SSL)
$rcmail_config['default_port'] = 993;
# line 87: specify domain name
$rcmail_config['mail_domain'] = 'irdhy.com';
# line 102: specify SMTP server (SSL)
$rcmail_config['smtp_server'] = 'ssl://mail.irdhy.com';
# line 105: specify SMTP port (SSL)
$rcmail_config['smtp_port'] = 465;
# line 180: change UserAgent
$rcmail_config['useragent'] = 'Irdhy Webmail';
# line 183: change title
$rcmail_config['product_name'] = 'Irdhy Webmail';
Note :
Untuk Edit2 Logo
/usr/share/roundcubemail/skins/default/templates/login.html
Edit Gambar
/usr/share/roundcubemail/skins/default/images/
Membuat Mail Server Using Postfix ( SMTP ) dan Dovecot ( IMAP / POP3 ) Fedora 14
IP Address : 192.168.11.11
Network : 192.168.11.0/24
Note :
Pastikan DNS Server Nya sudah berjalan lancar dan sudah di Config MX ( Mail Excange ) Recordnya buat IP Mail Server Tsb..
Langsung Aja Bos..
1. Install Postfix
- yum install postfix
2. Edit file /etc/postfix/main.cf
- vi /etc/postfix/main.cf
• Hilangkan tanda ( # ) pada myhostname line, dan rubah host.domain.tld dengan domain mail server anda, sbg contoh mail.irdhy.com.
• Hilangkan tanda ( # ) pada mydomain line, dan rubah domain.tld dengan domain anda, sbg contoh irdhy.com.
• Hilangkan tanda ( # ) pada myorigin = $mydomain line
• Hilangkan tanda ( # ) pada myorigin = $myhostname line.
• Hilangkan tanda ( # ) pada mydestination = $myhostname, localhost.$mydomain line.
• Hilangkan tanda ( # ) pada mydestination = $myhostname, localhost.$mydomain, localhost, $mydomain
• Hilangkan tanda ( # ) pada inet_interfaces = all line.
• Tambahkan tanda ( # ) pada inet_interfaces = localhost line.
• Hilangkan tanda ( # ) pada mynetworks = 168.100.189.0/28, 127.0.0.1; replace 168.100.189.0/28 Sbg contoh saya ganti dengan network 192.168.11.0/24
• Hilangkan tanda ( # ) pada home_mailbox = Maildir/
• Hilangkan tanda ( # ) pada mail_spool_directory = /var/mail
• Hilangkan tanda ( # ) pada mail_spool_directory = /var/spool/mail
3. Secara default fedora 14 Sudah terinstall Sendmail agar Postfix bisa berjalan edit alternaif MTA
- alternatives --config mta
There are 2 programs which provide 'mta'.
Selection Command
-----------------------------------------------
* 1 /usr/sbin/sendmail.sendmail
+ 2 /usr/sbin/sendmail.postfix
Enter to keep the current selection[+], or type selection number: 2
* Pilih postfix dengan memilih nomor 2
4. Matikan sendmail karena bila service sendmail aktif akan bentro port 25 dan saat restart postfix ada ada log FAILED
- service sendmail stop
- chkconfig sendmail off
5. Restart postfix dan cek konfigurasi agar autorun
- /etc/init.d/postfix restart
- service postfix restart
- chkconfig postfix on
6. Install Dovecot ( Untuk POP3 / IMAP Server )
- yum install dovecot
7. Masuk Direktori Dovecot Conf
- vi /etc/dovecot/dovecot_conf
Line #protocols = imap pop3 lmtp -->> Hilangkan tanda ( # )
8. Masuk Direktori Autentikasi Dovecot
- vi /etc/dovecot/conf.d/10-auth.conf
Line #disable_plaintext_auth = yes -->> Hilangkan tanda ( # )
* Rubah menjadi
- disable_plaintext_auth = no
9. Restart Dovecot
- /etc/init.d/dovecot restart
- service dovecot start
- chkconfig dovecot on
10. Add User
- adduser irdhy
- passwd irdhy
Changing password for user irdhy.
New password: test
Retype new password: test
passwd: all authentication tokens updated successfully.
11. Login Menggunakan Mail Client / Outlook setting sesuai konfigurasi diatas.
* Incoming ( POP3/IMAP ) n Outgoing ( SMTP ) menggunakan mail.irdhy.com
Selesai..
Konfigurasi SSL / TLS Encryption Dovecot dan Postfix
( Untuk Enkripsi Biar lebih aman.. Biar lebih secure deh pokonya )
Konfigurasi SSL / TLS Encryption Dovecot dan Postfix
( Untuk Enkripsi Biar lebih aman.. Biar lebih secure deh pokonya )
1. Remove Certificate dan Key Default Dovecot
- rm /etc/pki/dovecot/certs/dovecot.pem
- rm /etc/pki/dovecot/private/dovecot.pem.
2. Install Sertifikasi Baru
- /usr/libexec/dovecot/mkcert.sh
Script diatas akan membuat sertifikasi dan key baru didalam direktori /etc/pki/dovecot/certs dan /etc/pki/
dovecot/private.
3. Masuk direktori Dovecot SSL Configuration
- vi /etc/dovecot/conf.d/10-ssl.conf
Line # SSL/TLS support: yes, no, required.
==== Hilangkan tanda ( # ) untuk mengaktifkan SSL ===
#ssl = yes
4. Restart Dovecot
- /etc/init.d/dovecot restart
- service dovecot restart
5. Masuk direktori Postfix dan Buat direktori untuk Certificate dan Key
- mkdir /etc/postfix/certs
- mkdir /etc/postfix/private
6. Copi Certificate n Key Dovecot
- cp /etc/pki/dovecot/certs/dovecot.pem /etc/postfix/certs
- cp /etc/pki/dovecot/private/dovecot.pem /etc/postfix/private
7. Buat File di Postfix Main.cf
- vi /etc/postfix/main.cf
========== Tambahkan di Line terakhir Konfigurasi seperti di bawah ============
smtpd_use_tls = yes
smtpd_tls_cert_file = /etc/postfix/certs/dovecot.pem
smtpd_tls_key_file = /etc/postfix/private/dovecot.pem
8. Masuk Direktori Postfix master.cf
- vi /etc/postfix/master.cf
========== Hilangkan Tanda ( # ) Pada :
#smtps inet n - n - - smtpd
# -o smtpd_tls_wrappermode=yes
Login menggunakan Mail Client Untuk Receive Gunakan TLS / SSL Encryption dan Untuk Transport dunakan TLS Encryption.
Terima kasih
Hasilnya Boss
[root@fedora irdhy]# telnet mail.irdhy.com 25
Trying 192.168.11.11...
Connected to mail.irdhy.com.
Escape character is '^]'.
220 fedora.irdhy.com ESMTP Postfix
[root@fedora irdhy]# telnet 192.168.11.11 25
Trying 192.168.11.11...
Connected to 192.168.11.11.
Escape character is '^]'.
220 fedora.irdhy.com ESMTP Postfix
[root@irdianto irdhy]# telnet mail.irdhy.com 110
Trying 192.168.11.11...
Connected to mail.irdhy.com.
Escape character is '^]'.
+OK Dovecot ready.
[root@irdianto irdhy]# telnet 192.168.11.11 110
Trying 192.168.11.11...
Connected to 192.168.11.11.
Escape character is '^]'.
+OK Dovecot ready.
Silahkan mencoba..
Antispam
Install Amavisd-new, SpamAssassin And ClamAV ( Untuk Mail Security )
Tutorialnya Dapat Dilihat Disini..
http://www.howtoforge.com/virtual-users-and-domains-with-postfix-courier-mysql-and-squirrelmail-fedora-14-x86_64-p4
http://www.howtoforge.com/virtual-users-and-domains-with-postfix-courier-mysql-and-squirrelmail-fedora-14-x86_64-p5
Membuat MRTG Server ( Using Cacti & Mikrotik Template ) Fedora 14
Langsung Aja Bos
1 Install Cacti
- yum install cacti
2. Edit File /etc/httpd/conf/httpd.conf
- vi /etc/httpd/conf/httpd.conf
Line ServerAdmin root@localhost >> root@localhost ganti dengan Email yg valid
Line #ServerName www.example.com:80 >> hilangkan tanda # dan ganti dengan domain anda
3. Start httpd dan Cek konfigurasi httpd agar AutoRun
- service httpd start
- chkconfig httpd on
4. Edit File /etc/httpd/conf.d/cacti.conf
- vi /etc/httpd/conf.d/cacti.conf
Hapus the Allow from 127.0.0.1 line.
Rubah Order Deny,Allow to Order Allow,Deny.
Rubah the Deny from all to Allow from all
5. Edit file /etc/php.ini
- vi /etc/php.ini
Line ; Maximum amount of memory a script may consume (16M)
Line memory_limit - 64M
6. Install Mysql Server
- yum install mysql-server
7. Start dan Cek Konfig Agar Mysql AutoRun
- service mysqld start
- chkconfig mysqld on
8. Buat password pada Mysql Server dan Database Cacti
- mysqladmin -u root password 'P4ssword'
- mysqladmin -u root -pP4ssword create cacti
9. Masuk Direktori Mysql
- mysql -uroot -pP4ssword
10. Bila sudah masuk direktori mysql ( mysql> )
- GRANT ALL ON cacti.* to 'cactiuser'@'localhost' IDENTIFIED BY 'cactiuser';
- FLUSH PRIVILEGES;
11. Keluar dari Mysql
- exit
12. Import tabel Cacti ke Database Cacti
- mysql -u cactiuser -pcactiuser cacti < /usr/share/doc/cacti-0.8.7g/cacti.sql
13. Lihat Config
- vi /usr/share/cacti/include/config.php
Apabila konfigurasi sudah benar akan muncul seperti dibawah
/* make sure these values refect your actual database/host/user/password */
$database_type = "mysql";
$database_default = "cacti";
$database_hostname = "localhost";
$database_username = "cactiuser";
$database_password = "cactiuser";
$database_port = "3306";
?
14. Install SNMP Utils
- yum install net-snmp-utils
15. Edit File /etc/cron.d/cacti
- vi /etc/cron.d/cacti
Hilangkan tanda # pada */5 * * * * cacti /usr/bin/php /usr/share/cacti/poller.php > /dev/null 2>&1
16. Open Web Browser dan ketikan ipaddress/cacti atau localhost/cacti
17. Tinggal Next Next aja pada saat Instalasi web base cacti dan pastikan semua RRDTool ditemukan [FOUND]
18. Masuk ke Cacti dengan User admin dan Isi password sesuai keinginan
Instalasi Template Mikrotik ( Simple Queue n Queue Tree All In One )
1. Download Template Mikrotik ( mikrotik-20090210.zip )
- http://forums.cacti.net/download/file.php?id=15969&sid=4cab72929f5f4fcf91713085b7d2e58a ( Dapat Di Download Disini ) atau
- http://forums.cacti.net/viewtopic.php?t=25349 ( Temukan file Download mikrotik-20090210.zip )
2. Extrak File mikrotik-20090210.zip ( Jangan sampai lupa Taruhnya )
3. Login di terminal dan temukan File Template yg tadi di ekstrak
- zipdir/scripts/mikrotik_wireless_interfaces.php --> /usr/share/cacti/scripts/mikrotik_wireless_interfaces.php
- zipdir/scripts/mikrotik_ppp_connections.php --> /usr/share/cacti/scripts/mikrotik_ppp_connections.php
- zipdir/resources/script_server/mikrotik_wireless_interfaces.xml --> /usr/share/cacti/resources/script_server/mikrotik_wireless_interfaces.xml
- zipdir/resources/snmp_queries/mikrotik_queue_simple.xml --> /usr/share/cacti/resources/snmp_queries/mikrotik_queue_simple.xml
- zipdir/resources/snmp_queries/mikrotik_queue_tree.xml --> /usr/share/cacti/resources/snmp_queries/mikrotik_queue_tree.xml
- zipdir/resources/snmp_queries/mikrotik_wireless_client.xml --> /usr/share/cacti/resources/snmp_queries/mikrotik_wireless_client.xml
4. Login ke Cacti melalui web browser dengan user administrator
- Import zipdir/templates/cacti_host_template_mikrotik.xml --> Import template pada Console nya ( Web Browser Cacti )
Selesai dan Reboot...
1. Lihat File Template Mikrotik yg tadi di Download dan temukan di dalam direktori template ( cacti_host_template_mikrotik.xml )
2. Nah setelah selesai di terminal baru masuk ke Cacti dengan user Administrator
3. Import template cacti_host_template_mikrotik.xml
4. Masuk data queries pilih Mikrotik Queue dan pastikan Succesfully located XML file
5. Create device connect via SNMP pilih host template nya Mikrotik Queue ( Atau sesuai dengan template yg terisntall )
6. Otomatis seluruh Interface dan Queue nya di mikrotik akan tampil di Cacti ( Tinggal ganti nama sesusai dengan nama Client/Interface )
7. Selesai
Selamat Mencoba..
Instalasi Template Mikrotik Costumize ( Bila Menggunakan salah sati dari Queue
1. Masuk ke Direktori Cacti ( Snmp Queries )
- cd /usr/shared/cacti/resource/snmp_queries
2. Download template Mikrotik Simple Queue ( Bila menggunakan Simple Queue )
- wget http://www.nixnux.or.id/wp-content/uploads/2008/11/cacti-mikrotik-queue-simple.zip
3. Download template Mikrotik Queue Tree ( Bila menggunakan Queue Tree )
- wget http://www.nixnux.or.id/wp-content/uploads/2008/11/cacti-mikrotik-queue-tree.zip
4. Ekstrak Template yg tadi di download pilih salah satu Simple Queue atau Queue Tree
- unzip cacti-mikrotik-queue-simple.zip
- unzip cacti-mikrotik-queue-tree.zip
Masuk ke Cacti Browser ( Web Based )
1. Download Templatenya lagi kali ini masuk lewat web-based nya ( Cacti )
- http://www.nixnux.or.id/wp-content/uploads/2008/11/cacti-mikrotik-queue-simple.zip
- http://www.nixnux.or.id/wp-content/uploads/2008/11/cacti-mikrotik-queue-tree.zip
2. Ekstrak file cacti-mikrotik-queue-simple.zip atau cacti-mikrotik-queue-tree.zip ( Jangan sampai lupa taruhnya )
3. Nah setelah selesai di terminal baru masuk ke Cacti dengan user Administrator
4. Import template satu persatu file .xml nya
5. Masuk data queries pilih Mikrotik Queue dan pastikan Succesfully located XML file
6. Create device connect via SNMP pilih host template nya Mikrotik Queue ( Atau sesuai dengan template yg terisntall )
7. Otomatis seluruh Interface dan Queue nya di mikrotik akan tampil di Cacti ( Tinggal ganti nama sesusai dengan nama Client/Interface )
8. Selesai
Selamat Mencoba..
Membuat Proxy Server ( Using Squid ) Fedora 14
IP Proxy Server 192.168.11.11
My Network Area 192.168.11.0/24
Langsung aja boss
1.Install Squid
- yum install squid
2.Masuk ke direktori squid.conf karena konfigurasi akan tersimpan disini
- vi /etc/squid/squid.conf
==== Networks Yg Di Allow ====
# Example rule allowing access from your local networks.
# Adapt to list your (internal) IP networks from where browsing
# should be allowed
acl localnet src 10.0.0.0/8 # RFC1918 possible internal network
acl localnet src 172.16.0.0/12 # RFC1918 possible internal network
acl localnet src 192.168.0.0/16 # RFC1918 possible internal network
acl localnet src fc00::/7 # RFC 4193 local private network range
acl localnet src fe80::/10 # RFC 4291 link-local (directly plugged) machines
Note :
Secara default IP Private sudah ada di ACL ( Access Control )
==== Hapus semua acl localnet area ====
==== Buat rule baru acl localnet untuk Networks ====
- acl localnet src 192.168.11.0/24 # My Networks
==== Port yg Di Allow ====
acl SSL_ports port 443
acl Safe_ports port 80 # http
acl Safe_ports port 21 # ftp
acl Safe_ports port 443 # https
acl Safe_ports port 70 # gopher
acl Safe_ports port 210 # wais
acl Safe_ports port 1025-65535 # unregistered ports
acl Safe_ports port 280 # http-mgmt
acl Safe_ports port 488 # gss-http
acl Safe_ports port 591 # filemaker
acl Safe_ports port 777 # multiling http
acl CONNECT method CONNECT
==== Tambahkan acl SSL Port Allow untuk Internet Messenger ====
- acl SSL_ports port 5050 # Internet Messenger
==== Tambahkan IP Address dan Port Untuk Proxy Tsb ====
# Squid normally listens to port 3128
http_port 3128
http_port 192.168.11.11:3128
==== Direktori Cache ====
# Uncomment and adjust the following to add a disk cache directory.
#cache_dir ufs /var/spool/squid 100 16 256
==== Hilangkan tanda # pada chace_dir dan ubah menjadi ====
- chace_dir ifs /var/spool/squid 65000 16 256
Note :
65000 adalah satuan dalam MB ( 65 GB ) hardisk yg digunakan karena hardisk saya 80 GB... Baiknya 70% dari total Harddisk
==== Tambahkan Rule Memory Chace ====
# Chace Memory Limit
- cache_mem 100 MB
Note :
Baiknya 10% dari RAM. saya menggunakan RAM 1GB
==== Tambahkan Rule Visible Hostname ====
# Visible Hostname
- visible_hostname proxy-irdhy
==== Biar Lebih Maknyuss Tambahkan Refresh_Pattern ====
refresh_pattern (Release|Package(.gz)*)$ 0 80% 2880
refresh_pattern -i .(jpg|png|jpeg|bmp|gif)$ 10240 90% 43200
refresh_pattern -i .(deb|rpm|tgz|bz2|tar|gz)$ 10240 100% 43200
refresh_pattern -i .(class|css|js|gif|jpg)$ 10080 90% 43200
refresh_pattern -i .(jpe|jpeg|png|bmp|tif)$ 10080 90% 43200
refresh_pattern -i .(tiff|qt)$ 10080 90% 43200
refresh_pattern -i .(gz|arj|lha|lzh)$ 10080 90% 43200
refresh_pattern -i .(rar|tgz|tar|bin)$ 10080 90% 43200
refresh_pattern -i .(hqx|pdf|rtf|doc|swf)$ 10080 90% 43200
refresh_pattern -i .(inc|cab|ad|txt|dll)$ 10080 90% 43200
refresh_pattern -i .(asp|acgi|pl|shtml|php3|php)$ 2 20% 4320
refresh_pattern ^http://mail.yahoo.com/.* 720 100% 4320
refresh_pattern ^http://mail.google.com/.* 720 100% 4320
refresh_pattern ^http://*.yahoo.*/.* 720 100% 4320
refresh_pattern ^http://*.friendster.*/.* 720 100% 4320
refresh_pattern ^http://*.facebook.*/.* 720 100% 4320
refresh_pattern ^http://*.detik.*/.* 720 100% 4320
refresh_pattern ^http://*.detiknews.*/.* 720 100% 4320
refresh_pattern ^http://*.detikfinance.*/.* 720 100% 4320
refresh_pattern ^http://*.detikhot.*/.* 720 100% 4320
refresh_pattern ^http://*.detikinet.*/.* 720 100% 4320
refresh_pattern ^http://*.detiksport.*/.* 720 100% 4320
refresh_pattern ^http://*.detikoto.*/.* 720 100% 4320
refresh_pattern ^http://*.detikfood.*/.* 720 100% 4320
refresh_pattern ^http://*.detikfoto.*/.* 720 100% 4320
refresh_pattern ^http://*.kompas.*/.* 720 100% 4320
refresh_pattern ^http://*.okezone.*/.* 720 100% 4320
refresh_pattern ^http://*.google.*/.* 720 100% 4320
refresh_pattern ^http://*.youtube.*/.* 720 100% 4320
# Images
refresh_pattern -i \.gif$ 10080 90% 43200
refresh_pattern -i \.jpg$ 10080 90% 43200
refresh_pattern -i \.png$ 10080 90% 43200
refresh_pattern -i \.jpeg$ 10080 90% 43200
refresh_pattern -i \.bmp$ 10080 90% 43200
refresh_pattern -i \.psd$ 10080 90% 43200
refresh_pattern -i \.ad$ 10080 90% 43200
refresh_pattern -i \.gif\?$ 10080 90% 43200
refresh_pattern -i \.jpg\?$ 10080 90% 43200
refresh_pattern -i \.png\?$ 10080 90% 43200
refresh_pattern -i \.jpeg\?$ 10080 90% 43200
refresh_pattern -i \.psd\?$ 10080 90% 43200
quick_abort_min 128 KB
quick_abort_max 4098 KB
quick_abort_pct 100%
3. Restart Squid
- /etc/init.d/squid restart
- service squid start
- chkconfig squid on ( Autorun )
4. Chek squid
- squid -z
- squid -k parse
Bila tidak terjadi kesalahan akan muncul
[root@fedora irdhy]# squid -z
2011/06/19 23:03:51| Squid is already running! Process ID 6268
Bila terjadi kesalahan atau peringatan akan muncul pesan WARNING
5. Masukan proxy pada browser dan lihat log squid pada server
- tail -f /var/log/squid/access_log
Selesai
Selamat mencoba..
untuk direktori chace silahkan disesuaikan dengan kebutuhan anda..
Terima kasih..
Note :
Pada squid 3 direkomendasikan untuk konfigurasi seminimal mungkin untuk memperoleh performance maximal dari proxy..
Selamat mencoba
Membuat DNS Server ( Using Bind ) Fedora 14
IP Server 192.168.11.11
Example name server ns1.irdhy.com
Langsung aja boss
1.Install Bind
- yum install bind
2.Masuk ke direktori named.conf karena konfigurasi akan tersimpan disini
- vi /etc/named.conf
- Ubah Line 11
listen-on port 53 { 127.0.0.1; }; menjadi listen-on port 53 { 192.168.11.11; };
- Ubah Line 17
allow-query { localhost; }; menjadi allow-query { 192.168.11.0/24; };
Note :
- Listen port 53 Adalah IP Address DNS Server yg digunakan
- Allow Query Adalah Client yg Dapat mengakses DNS Server tsb / Networks yg bisa Akses DNS tsb.
3.Tambahkan zone untuk ns1.irdhy.com sbb :
# FORWARD ZONE ( HOSTNAME TO IP ADDRESS )
zone "irdhy.com" IN {
type master;
file "/var/named/forward.zone";
allow-update { none; };
};
# REVERSE ZONE ( IP ADDRESS TO HOSTNAME )
zone "11.168.192.in-addr.arpa" IN {
type master;
file "/var/named/reverse.zone";
allow-update { none; };
};
4.Buat File Forward Zone ( Untuk Hostname )
- vi /var/named/forward.zone
5.Config file Forward Zone sbb :
$ORIGIN irdhy.com.
$TTL 86400
@ IN SOA ns1.irdhy.com. hostmaster.irdhy.com. (
2001062501 ; serial
21600 ; refresh after 6 hours
3600 ; retry after 1 hour
604800 ; expire after 1 week
86400 ) ; minimum TTL of 1 day
;
;
IN NS ns1.irdhy.com.
ns1 IN A 192.168.11.11
;
;
@ IN MX 10 mail.irdhy.com.
mail IN A 192.168.11.11
;
;
; This sample zone file illustrates sharing the same IP addresses
; for multiple services:
;
services IN A 192.168.11.11
ftp IN CNAME services.irdhy.com.
www IN CNAME services.irdhy.com.
6.Buat File Reverse Zone ( Untuk IP Address )
- vi /var/named/reverse.zone
7.Config File Reverse Zone sbb :
$ORIGIN 11.168.192.in-addr.arpa.
$TTL 86400
@ IN SOA ns1.irdhy.com. hostmaster.irdhy.com. (
2001062501 ; serial
21600 ; refresh after 6 hours
3600 ; retry after 1 hour
604800 ; expire after 1 week
86400 ) ; minimum TTL of 1 day
;
@ IN NS ns1.irdhy.com.
11 IN PTR ns1.irdhy.com.
11 IN PTR ftp.irdhy.com.
10. Restart Bind
- /etc/init.d/named restart
- service named start
11. Agar Config yg kita buat langsung berjalan ( Autorun )
- chkconfig named on
12. Disable Firewall
- service iptables save
- service iptables stop
- chkconfig iptables off
13. Disable SELinux
- vi /etc/selinux/config
Ubah SELINUX=enforcing menjadi SELINUX=disabled
14. Reboot
Selesai
Ini Hasil nya boss...
Di Linux Fedora 14
[root@fedora irdhy]# dig -x 192.168.11.11
; <<>> DiG 9.7.4b1-RedHat-9.7.4-0.2.b1.fc14 <<>> -x 192.168.11.11
;; global options: +cmd
;; Got answer:
;; ->>HEADER<<- opcode: QUERY, status: NOERROR, id: 45158
;; flags: qr aa rd ra; QUERY: 1, ANSWER: 1, AUTHORITY: 1, ADDITIONAL: 1
;; QUESTION SECTION:
;11.11.168.192.in-addr.arpa. IN PTR
;; ANSWER SECTION:
11.11.168.192.in-addr.arpa. 86400 IN PTR ns1.irdhy.com.
;; AUTHORITY SECTION:
11.168.192.in-addr.arpa. 86400 IN NS ns1.irdhy.com.
;; ADDITIONAL SECTION:
ns1.irdhy.com. 86400 IN A 192.168.11.11
;; Query time: 0 msec
;; SERVER: 192.168.11.11#53(192.168.11.11)
;; WHEN: Sat Jun 18 02:08:39 2011
;; MSG SIZE rcvd: 101
[root@fedora irdhy]# dig www.irdhy.com
; <<>> DiG 9.7.4b1-RedHat-9.7.4-0.2.b1.fc14 <<>> www.irdhy.com
;; global options: +cmd
;; Got answer:
;; ->>HEADER<<- opcode: QUERY, status: NOERROR, id: 17076
;; flags: qr aa rd ra; QUERY: 1, ANSWER: 1, AUTHORITY: 1, ADDITIONAL: 0
;; QUESTION SECTION:
;www.irdhy.com. IN A
;; ANSWER SECTION:
www.irdhy.com. 86400 IN CNAME irdhy.com.
;; AUTHORITY SECTION:
irdhy.com. 86400 IN SOA ns1.irdhy.com. hostmaster.irdhy.com. 2001062501 21600 3600 604800 86400
;; Query time: 0 msec
;; SERVER: 192.168.11.11#53(192.168.11.11)
;; WHEN: Sat Jun 18 02:10:19 2011
;; MSG SIZE rcvd: 96
[root@fedora irdhy]# nslookup www.yahoo.com
Server: 192.168.11.11
Address: 192.168.11.11#53
Non-authoritative answer:
www.yahoo.com canonical name = fpfd.wa1.b.yahoo.com.
fpfd.wa1.b.yahoo.com canonical name = fp.wg1.b.yahoo.com.
fp.wg1.b.yahoo.com canonical name = any-fp.wa1.b.yahoo.com.
Name: any-fp.wa1.b.yahoo.com
Address: 98.137.149.56
Name: any-fp.wa1.b.yahoo.com
Address: 72.30.2.43
Selamat mencoba
Note :
- IP Address untuk DNS Server harus menggunakan IP Statik
- Ganti 11.168.192 tiga oktet pertama jaringan yang anda gunakan
- Juga file zona /var/named/reverse.zone harus tepat. Hal ini juga harus disesuaikan dengan oktet pertama jaringan anda.
- MX digunakan untuk Mail Server
- Saya membuat hanya 1 Dns saja ( Primary Master ) untuk slave ( Secondary Master ) nya bisa lihat
Terima kasih.
Referensi
Fedora-14-Manual-Guide
Thank's
Membuat DNS Server Ubuntu 10.10
IP Server 192.168.11.11
Example name server ns.irdhy.com
Langsung aja boss
1.Install Bind9 dan dnsutils
- apt-get install bind9
- apt-get install dnsutils
- /etc/init.d/bind9 restart
2.Masuk ke direktori named.conf.local karena konfigurasi akan tersimpan disini
- nano /etc/bind/named.conf.local
3.Tambahkan zone untuk ns.irdhy.com sbb :
zone "irdhy.com" {
type master;
file "/etc/bind/db.irdhy.com";
};
4.Copy file db.local ke db.irdhy.com agar mudah dikonfigurasi
- cp /etc/bind/db.local /etc/bind/db.irdhy.com
5.Config file db.irdhy.com sbb :
; BIND data file for local loopback interface
;
$TTL 604800
@ IN SOA ns.irdhy.com. root.irdhy.com. (
2 ; Serial
604800 ; Refresh
86400 ; Retry
2419200 ; Expire
604800 ) ; Negative Cache TTL
;
@ IN NS ns.irdhy.com.
@ IN A 127.0.0.1
@ IN AAAA ::1
ns IN A 192.168.11.11
6.Masuk kembali ke direktori named.conf.local
- nano /etc/bind/named.conf.local
7.Tambahkan zone untuk ip address sbb :
zone "11.168.192.in-addr.arpa" {
type master;
notify no;
file "/etc/bind/db.ipaddress";
};
8.Copy file db.127 ke db.ipaddress agar mudah dikonfigurasi
- cp /etc/bind/db.127 /etc/bind/db.ipaddress
9.Config File db.ipaddress sbb :
; BIND reverse data file for local loopback interface
;
$TTL 604800
@ IN SOA ns.irdhy.com. root.irdhy.com. (
1 ; Serial
604800 ; Refresh
86400 ; Retry
2419200 ; Expire
604800 ) ; Negative Cache TTL
;
@ IN NS ns.
11 IN PTR ns.irdhy.com.
10. Restart Bind9
- /etc/init.d/bind9 restart
Selesai
Ini Hasil nya boss...
Di Linux Ubuntu 10.10
root@irdhy:/home/irdhy# /etc/init.d/bind9 restart
* Stopping domain name service... bind9 [ OK ]
* Starting domain name service... bind9 [ OK ]
root@irdhy:/home/irdhy# nslookup www.yahoo.com
Server: 192.168.11.11
Address: 192.168.11.11#53
Non-authoritative answer:
www.yahoo.com canonical name = fp.wg1.b.yahoo.com.
fp.wg1.b.yahoo.com canonical name = any-fp.wa1.b.yahoo.com.
Name: any-fp.wa1.b.yahoo.com
Address: 72.30.2.43
Name: any-fp.wa1.b.yahoo.com
Address: 98.137.149.56
root@irdhy:/home/irdhy# dig -x 127.0.0.1
;; Query time: 0 msec
;; SERVER: 192.168.11.11#53(192.168.11.11)
;; WHEN: Sun Apr 24 04:19:02 2011
;; MSG SIZE rcvd: 121
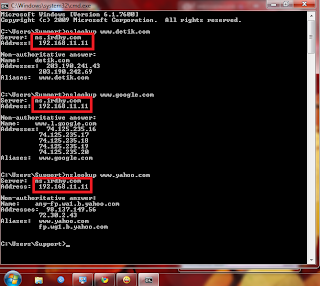
Di Windows 7 Ultimate
Selamat mencoba
Note :
- IP Address untuk DNS Server harus menggunakan IP Statik
- Ganti 11.168.192 tiga oktet pertama jaringan yang anda gunakan
- Juga file zona /etc/bind/db.ipaddress harus tepat. Hal ini juga harus disesuaikan dengan oktet pertama jaringan anda.
- Saya membuat hanya 1 Dns saja ( Primary Master ) untuk slave ( Secondary Master ) nya bisa lihat di Ubuntu Server Guide
Terima kasih.
Referensi
Langganan:
Postingan (Atom)